Tuesday, December 1, 2020

Wing: Ribs, Leading and Trailing Edges

The weather has driven the project indoors, so the work tables have been placed and leveled, and work continues on the lower center wing section.

Wide-angle view of the shop area.


The ribs are temporarily removed while the trailing edge framework is fabricated.


After the ribs are bound in place with epoxy resin and fiberglass, the leading edge foam panels are fitted and epoxied. Some cutouts are made to accommodate strut channels.


Some epoxy and micro-balloon filler on the underside helps reinforce the panels.

Next, the trailing edge foam is fitted and epoxied into place.

The wing section is flipped over now, elevated, and the epoxy resin and fiberglass strips applied.


Vinyl spackling is applied to fill in voids then sanded with an open mesh cloth - typically used by drywallers for smoothing dried joint compound. The center third is coated with epoxy resin. The resin should resist any potential fuel spill, since the tank will be sitting on the top of the wing (near the cross bracing seen above). If a solvent-based wing covering adhesive is to be used, the entire length would be coated. In this case, water-based Stewart Systems is anticipated, so Zinsser 1-2-3 was used on the outboard sections.


Sunday, October 18, 2020

Building the Wing (Well, 1 of 6 Anyway)

Finally, time to build what most people would associate with an airplane (technically a 'vehicle' since this is an FAR Part 103 ultralight) - a wing. Only one new skill is anticipated: assembly of stainless steel cable, thimbles and Nicopress sleeves.

Wing assembly well under way.

Use of vinyl tape to assure a closer fit between main spar and inner reinforcement tubes. In this case, two thicknesses.

First step: spread thimble open to accept the thimble bushing.

Place the bushing and slide the tang over the thimble and into the bushing slot...

Restore the thimble to its original shape.

Nicopress sleeves and press.

Squaring up the frame by measuring diagonally across four long temporary bolts at the corners. Fixed in place with a wood scrap and clamps

Other side (out of picture) pre-crimped, getting ready to crimp this side.

Rib bending table with full-sized template as a guide

The end ribs are riveted and braced. The inner six ribs will be 'floating' - secured with epoxy/fiberglass bands.

Stanley saw horses were on hand and worked well enough.

Finishing some ribs. Used ViseGrips, jaws partially open about 1/4", to work the ends closed. Touched up on a piece of steel rail (train track) using a bronze hammer. Clear shipping tape keeping the template usable.

Ribs in place.

Rib ends temporarily taped in place with vinyl tape.

Another view. This was the last good weather day for the season. Shop moved back into the basement until spring. Sigh...

Elevator Build

Bending the trailing edge tubes.
 

Test fitting the Elevator Control Horn Assembly

Fitting the ribs for gluing.


Setting up two leveled tables for rib fitting.

Wire used to keep inner reinforcing tube from shifting out of place.

Kitchen microplane used on foam to achieve desired shape.

Leveling out temporary ceiling hangers.

Epoxy layup of fiberglass. Painters tape helps keep ends in place during curing.

The day was a bit cooler than optimal for epoxy cure. Sunshine helped out.

Monday, September 7, 2020

Vertical Stabilizer, Epoxy On Vacation

Looking forward to giving my epoxy skills a rest. I'll be focusing next on the center wing sections, so it will be awhile before I'll need to indulge again.

Now that I've completed the rudder and horizontal stabilizer, the vertical stabilizer should be a breeze, right? Well, yes, it was getting easier.

Garage tech indeed.

Fitting the cross braces amounted to aligning the foam with small pencil marks and using my thumbnail to score a line. Cutting with a bare hacksaw blade, a hair oversize, then bringing down to size with a 100 grit garnet paper sanding block.

As learned previously, I layed-up the short brace pieces of fiberglass tape first, then glued the longer pieces over them. I also made use of the microballoon filler after the initial gluing. Also, paste waxing the melamine work surface worked like a charm in resisting any stray epoxy.

The top and bottom are coated with epoxy to resist the eventual melting effects of the Dacron covering chemicals.
High tech, it ain't.


Holding off on drilling holes until ready to assemble.

Hanging from ceiling makes placing fiberglass tape much easier.


Horizontal Stab and Always Time to Do It Over

Remember that expression, "Never time to do it right, but always time to do it over?"  Fits my experience with the horizontal stabilizer. After days of cutting ribs, gluing, installing and fiberglass-epoxy layup, I was not thrilled to learn that I'd oriented the rear tube 90° out of position:

That bolt in the foreground should be 90° clockwise. Doh!

One thought was to re-drill the tube, but that meant having 'extra' holes, and I didn't want to chance compromising the strength of the part. I decided to cut the foam at each rib about 1 inch from the tube, then drill out the four rivets on one end. That way I could separate the tube, clean it up, re-orient it properly and Bob's your uncle, fiberglass it back almost as good as new. As long as I had it apart, I added vinyl tape to the sleeves for a better fit, too.

Surgery complete, where are those sutures?


Post-op, patient recovering nicely.

Lessons learned:
  1. Fiberglass tape sequence matters. Take overlapping into account.
  2. My epoxy usage comes out to about .275 grams per lineal inch of fiberglass tape.
  3. Gravity is not your friend. When doing a vertical layup like this, be sure the tape overlaps some to help hold it in place. I found that blue painters tape can be helpful.
  4. Use a red rag like in the image above to keep your head from being drawn like a magnet to the aluminum (even though both are theoretically non-ferrous).

Uninvited Flying Friend

While in the garage, working on the horizontal stabilizer, I caught something out of the corner of my eye that was out of place. What I assume was an escaped pet parakeet.

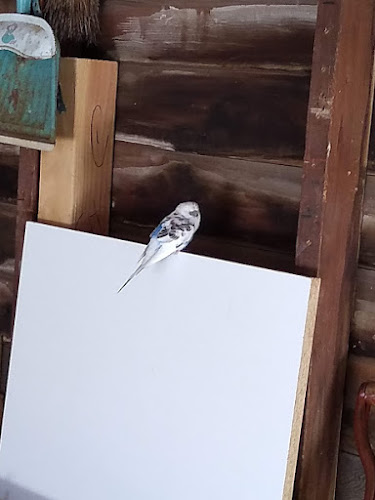
Unexpected volunteer.


He didn't mind handling, and didn't try to fly away when gently encouraged, so I placed a Facebook post in the local neighborhood group looking for anyone with a lost pet matching his description.

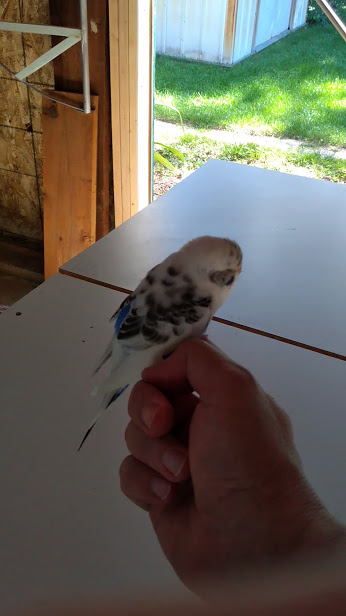
Pretty lethargic and probably hungry.


There were a few replies, some having checked with other bird owners, but no luck. In the meantime, I picked up an inexpensive cage and some bird food for his expected day or two sleepover.

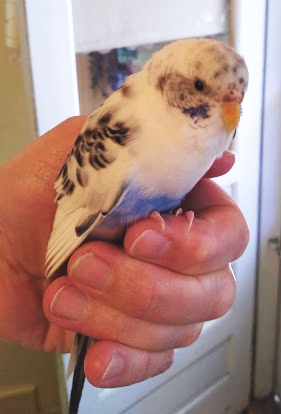
Turns out she had quite an appetite.

In the end, we had a local bird person that was willing the give her a home. Last we heard, she had a much bigger cage, a new name (Sapphire), some other bird friends and quite a talkative streak!

Pining for the fjords, no doubt.


Parts, Rudder and Guard Dog

Temporary bolt aligns parts for drilling.


Never succumb to the temptation of removing drill shavings by hand from the spindle while it's moving! Something I learned the hard way about forty years ago.

The component parts collection is growing (below), so I decided marking each and every part with a drawing page number and ID, would help later on.

Marking parts will help later, right?


While weather still permits, my unheated, one-car garage makes an excellent place to do epoxy work. Especially since my wife prefers not to have the house at a temperature that curing epoxy likes - 80° F. 

Guard Chihuahua keeps unauthorized insects out of the garage workshop!


Clear shipping tape keeps epoxy from sticking to the work surface. In the image below you can see my solution to the problem of needing a small, light-weight clamp for the foam: a couple of pieces of sawed off hardwood shim and a random carriage bolt with two nuts.

I later discovered that paste wax applied to the melamine work table surface works well for keeping epoxy at bay.

Gluing rudder braces and ribs with 'shim' clamps.

Fiberglass tape and epoxy layup complete. Some lessons learned:
  1. Rough up aluminum-to-glue surface with 100 grit sandpaper all the way around the tube before gluing the ribs and braces.
  2. Let the continuous fiberglass band overlap by about an inch. This keeps gravity from attempting to detach it from the foam.
  3. Wear breathing protection and gloves if you're sensitive to epoxy. I discovered that I am, probably from working with it over the years.
  4. Use microballoon filler mixed into the epoxy to approximate a peanut butter consistency. Works nicely to fill gaps that are inevitable when making non-precision cuts with a handheld knife or hacksaw blade. Only regular epoxy for the fiberglass tape.

Rudder almost ready for covering.