Sunday, April 26, 2020

Tail Time

My original plan, after completing the nose, was to build the lower center wing section. However, I was unable to find the spar tube (1.75 x .035) in stock at Aircraft Spruce, and available, but pricey at TW Metals ($388 for two 96" long tubes, about $13.00 for shipping). That's about $2,500 for the wing spar tubes alone. I was unable to find those dimensions in 6061-T6 aluminum tubing anywhere else on line. (Update: don't tell anyone, but Wick's has this tubing for $6.15/ft. An 11-hour road trip and I can save the shipping cost, too).

So, instead I began on the tail. I started with a few parts seen in the pics below. Since the shipping cost for anything over seven feet skyrocketed about eight months ago (at least for UPS), I bought shorter lengths and will connect them with an internal splice.


Temporary nuts.

Internal splice for trailing edge tube.
I was thinking of using an external sleeve on the trailing edge, but I saw what looked like an internal splice on one of Mike Sandlin's photo gallery pictures:

Splice?

My method was to cut a two inch piece of 3/8" tubing, put it in a vise and cut lengthwise on one side. I then tightened the vise to close the gap and repeated six to eight more times. I filed and rounded the piece to get the result in the picture. I plan to place two rivets about 1/2" apart on each side of the cut - facing inward.

I was able to find a very good price for pultruded (epoxy impregnated) carbon rods, 1.5mm x 1000m at a place called https://www.racedayquads.com. I'm hoping the very slightly smaller diameter is aceptable as the plans call out .063"


Monday, March 23, 2020

It's a Nose! It's a Plane! It's Just a Plane Nose...


Work is coming right along. Almost ready for another money transfusion - for parts. Next up is probably the lower center wing section. Aircraft Spruce is the only place I can find the spar tubes in the thickness specified in the plans.

The figure-8 stainless steel tangs are a bit harder to come by than I'd imagined. Lockwood Aviation Supply has them though at about $2 a throw.

Lessons learned?
  1. Well, a good quality pipe cutter is much quicker than using a band saw, then grinding the end square.
  2. Wearing gloves during ScotchBrite cleaning is a must.
  3. Installing hardwood vise jaw inserts should be done as soon as possible.
  4. Threaded rod with two locking nuts to serve as a head make excellent temporary bolts when you've forgotten to order enough.
  5. Vacuuming up the aluminum shavings from the previous work session makes for a good warm up at the beginning of a new session.
Control stick with some temporary nuts

Chair mounting coming up

Shear plate for the front wheel struts

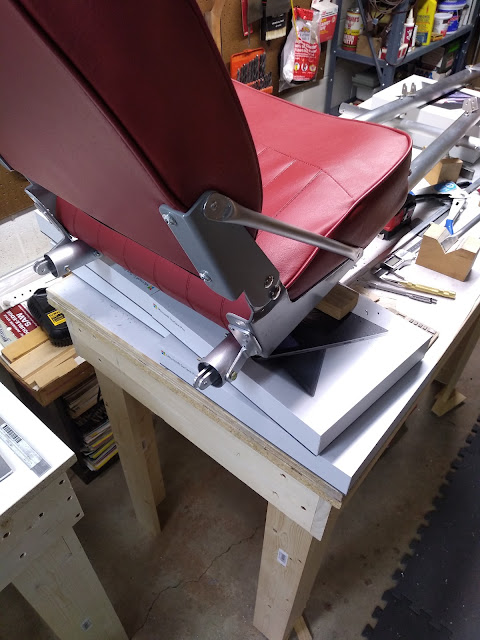
Seat back removed while fitting seat mount with temporary hardware (threaded rod with two nuts for the head)


Seat bracing in place. Time to sit down and pretend
Unicycle?

Parachute mounting frame just about complete - minus the plywood piece.
Seat attachment detail

Keeping rudder pedals in place to prevent tube damage

Stick restraint - plastic tie wrap.

Sunday, March 8, 2020

Fast Forward - Construction Under Way

The nose section is coming right along:


Visualization

Mike Sandlin's plans are exceptional. They're well organized, accurate, consistent and complete (and free!). I know this partly from mechanical drawing classes taken many years ago, but mainly by contrast to other plans. Without naming names, I've paid for more than one set that are incomplete and rife with errors; hand-drawn sections with cross-outs, scrawled illegible notations and inconsistent mark-up. The doodlings of a bored student come to mind.

When working from plans, especially those of us less experienced, understanding and visualization can be helped tremendously by transferring the parts into a program like SketchUp. Training and practice can make it easier to read a blueprint and turn parts around in your mind's eye, but nothing beats interactively turning an assembly in 3D, in real time. Best of all, measurements can be taken and reproduced. The risk is becoming too enamored of the program, and forgetting that the real goal is to produce a machine that will take you into the sky.

Here are a few SketchUp shots of the nose section:


Saturday, March 7, 2020

I'm Hooked

The designer's version. With luck mine will resemble this one day.


Over thirty years ago, I started toward my goal of obtaining a private pilot's license. A handful of lessons later, my job, family and finances conspired and pushed that dream onto the back burner. Actually, it fell behind the stove, joining other unrealized dreams: race car driver, astronaut and rock star.

In time, pilot's license medical certificate health requirements (and my inability to meet them) made my piloting goal completely academic. Or so I thought until last February when I came across a story about a Madison, Wisconsin researcher flying a Part-103 ultralight known as a Zigolo. Turns out there was a way to fly without a medical certificate - or a license for that matter. As long as the 'vehicle' met certain FAA-required parameters (maximum weight, stall speed, fuel capacity etc.) one technically could fly without any training whatsoever. Kind of like acting as your own attorney, but with more serious consequences.

Over the next year, that initial spark led to the Bloop and many other ultralights: Weedhopper, Sky Pup, Pouchel; even Gyroplanes. Mostly though, all shared important traits in common: two-axis flight control, solid design and (seeming) forgiveness in the hands of a low-time pilot. Plans were bought and studied. Forums joined. False starts started, and stopped. When the dust had cleared and having come with inches of starting a Pouchel build, I had returned back to my first infatuation, the Bloop.

Over the next four to forty months, I plan to continue to reach for (what I hope is) the lofty goal of flight. I've already started fabrication and will document that process in this blog.

-GH